How long could it take?
There's a stretch of good weather coming up, but I'm in California. It looks like it'll stay good into the following week. Let's try to put the roof on this weekend when I get back!
So I unpacked my work knapsack Friday night, and packed my cabin bag Saturday morning. Up at 6:00am. Chase and Katie joined us.
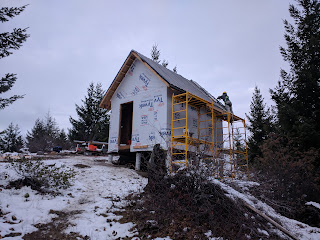
Saturday consistent of peeling off the tarp, hammering down any stray nails in the sheathing, laying the synfelt, and peeling the protective coating off of the metal panels. (We didn't notice when we took delivery the stickers that said "be sure to remove within 24 hours of delivery." They were a giant pain to peel off.)


Wow. A whole day and no metal on the roof.
Well, Sunday went better. We put up the two pieces of fascia trim that go on the west roof, and then laid down four of the main roof panels.

On Monday, we laid in two more full sheets, a half sheet to finish the west plane, fascia trim for the east side, another half sheet to start the east side, and two more full sheets. Wow, we're not getting much faster at this; we're sticking down about 100 square feet of metal per day. Well, we should be done Tuesday!
Things we've learned so far:


There's a stretch of good weather coming up, but I'm in California. It looks like it'll stay good into the following week. Let's try to put the roof on this weekend when I get back!
So I unpacked my work knapsack Friday night, and packed my cabin bag Saturday morning. Up at 6:00am. Chase and Katie joined us.
Saturday consistent of peeling off the tarp, hammering down any stray nails in the sheathing, laying the synfelt, and peeling the protective coating off of the metal panels. (We didn't notice when we took delivery the stickers that said "be sure to remove within 24 hours of delivery." They were a giant pain to peel off.)


Wow. A whole day and no metal on the roof.
Well, Sunday went better. We put up the two pieces of fascia trim that go on the west roof, and then laid down four of the main roof panels.

On Monday, we laid in two more full sheets, a half sheet to finish the west plane, fascia trim for the east side, another half sheet to start the east side, and two more full sheets. Wow, we're not getting much faster at this; we're sticking down about 100 square feet of metal per day. Well, we should be done Tuesday!
Things we've learned so far:
- Sometimes you have to back the screws out and drive them back in to get the metal to snug flush to the sheathing.
- We chose the fancy "Strata" roof profile, which has a narrow ridge to center the stitch screws on. We should have gone with the simpler "Delta" profile with its wider ridge.
- Getting the spacing and butyl tape right to make a flat, nice looking seam was tricky. The key was to err on the side of too much overlap.
- Our neighbor suggested using a multipurpose ladder as a roof scaffolding. There was no way we could walk directly on the 12:12 slope. We put a fair amount of foam pipe insulation on the ladder to protect the roof. Moving it around was still a hassle, but it worked pretty well from a safety standpoint.
On Tuesday, we had a couple hours' help from Calvin. We got the last four main panels on. I worked on fabricating the gable trim, and we got the three pieces of gable trim for the north side installed.


Okay, Wednesday is going to do the trick, right? Three pieces of gable trim for the south side went up before 10:30am.

Every so often we stop and look around and realize how gorgeous it is up here.

But for installing the ridge cap, we have a new problem: how will Eliot move across the roof? The folded ladder would rest on the ridge cap and damage it. We designed this little hobby horse that rests on the main panels, leaving a gap just big enough for the ridge cap:


He used the "chair" to scoot out from center to the edge the roof, caulking foam seal strip down to the main panels, then scoot back applying another layer of caulking to the top of the foam. The caulking was really stiff in the freezing weather! We brought it into the hotel to warm it up each night, and brought it to the work site in a styrofoam "cooler" to keep it warm.

Wow, getting that caulking and foam into place, with the complicated new locomotion system, was surprisingly difficult. And then, in the afternoon, it got a step harder when we took out the last roof anchor. It was about to be covered up by the final piece of ridge cap. Just one last piece of metal! We rigged up a big safety rope with a loop at the top to act as the harness anchor point. Lesson for next time:
- We should have affixed a permanent roof anchor under the ridge cap for any future excursions onto the roof. I bought one at the hardware store, and I have it ready for next time.
So, here we are on Thursday morning, day 6 of our weekend roof install. Up at the cabin by 8:30am, and the last handful of screws takes about ten minutes to put in. Har de har har.

Comments
Post a Comment