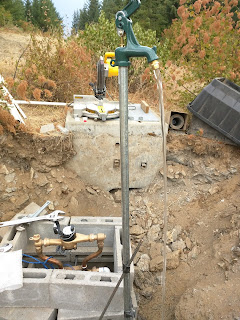
Saturday's big accomplishment was getting our first (intentional) running water!
That's the lede, so the post would have a better representative photo, but let's tell the story in order. :v)
I arrived to the property to find that our excavator team (Smith Excavating from Ellensburg) had been hard at work, backfilling the foundation and the utility trench.
I got started with a trip to the dump to clean out leftovers from forming the foundation.
The next item was that the excavators had dropped sand along the easement, accidentally burying the property corner marker. How would I recover them?
Second try was: I realized that when we did the walk-around survey, we'd left a phone sitting exactly on top of that corner marker as a barometer reference. For an hour. I found that spreadsheet, and averaged the GPS coordinates to get a super-precise GPS location. I walked up with my own phone, and stood at the same coordinate. It looked way wrong from my memory. It was reporting "10 ft" accuracy, and I didn't want to dig in a 100sf area.
Finally, I realized that the next property corner was still exposed, 259.70' feet away according to the survey.
I grabbed my 330' tape measure and spray painted a green arc at 259' 9" from the exposed corner. In the other axis, I could bound the digging to about 5' -- I know the corner was (a) not in the hole that was already present, and (b) not under the tree, since it appears in aerial photos. I dug a little sand away, and the marker was directly under the paint.
Next up was getting to work on the plumbing. I wanted to pressurize the 200' pipe to ensure there wasn't a leak at the joint in the middle before we buried it. I got this wrong several times. I put the meter base in backwards which I discovered because it has a backflow preventer valve. I had to drive to town for couplers; there are probably five more PVC joints in this thing than there need to be.
But, finally, I got everything in place:
- PVC from the valve stub (red handle at center left below) up to the meter base,
- from the output of the meter to the tee that feeds the spigot,
- from the tee to a compression fitting that supplies the 200' of poly water tube.
Here's the glorious moment of the first water passing through the meter. (The meter starts at 0.8 cu. ft. from testing at the factory.) When I open the valve here, the water isn't going anywhere other than filling the cubic foot of volume in the pipe (and pressurizing the air that used to fill it).
I terminated the poly tube temporarily with a garden spigot; here is the first water arriving at the downhill (cabin) end of the pipe.
And the motivating goal was achieved: the splice in the middle of the trench was tested and found unleaky! So I foamed a protective tube over the splice, to keep rocks from grinding away at the poly tube.
The last order of business was to extend my water meter wires. I had planned to run some wire up the trench from the shop to the water meter so we could have electronics monitor the water meter and send me a message if water was flowing when it shouldn't be. Unfortunately, I left the box of ethernet cable at home. I had a bunch of 16ga wire lying around at the lot, so last week Eliot and I had twisted a bunch up and laid it in the trench before it got backfilled. Unfortunately, I was sloppy about measurement, and it was at least 30' short -- long enough to remain exposed at each end, but not long enough to reach the water meter or the shop. So today I spliced more wire onto each end, and protected it with heat shrink tubes with hot glue sealant.


Comments
Post a Comment